Raster to ASCII, Float, Point, Polygon, Polyline and Video Tools
Raster to ASCII
How to use Raster to ASCII Tool in ArcToolbox ArcMap ArcGIS??
 |
| Raster to ASCII |
Path to access the tool
:
Raster to ASCII Tool, From Raster Toolset, Conversion Toolbox
Raster to ASCII
Converts a raster dataset to an ASCII text file representing raster data.
1. Input raster
The input raster
dataset.
The raster can be
integer or floating-point type.
2.
Output ASCII raster file
The output ASCII raster file.
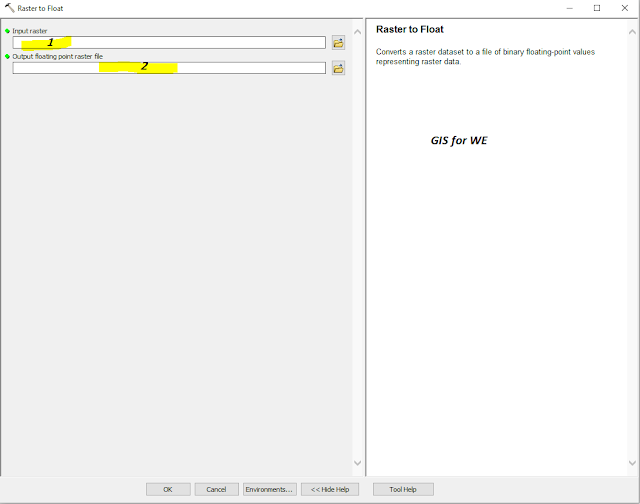
Raster to Float
How to use Raster to Float Tool in ArcToolbox ArcMap ArcGIS??
 |
| Raster to Float |
Path to access the tool
:
Raster to Float Tool, From Raster Toolset, Conversion Toolbox
Raster to Float
Converts a raster
dataset to a file of binary floating-point values representing raster data.
1. Input raster
The input raster
dataset.
The raster can be
integer or floating-point type.
2.
Output floating point raster file
The output
floating-point raster file.
The file name must have a .flt extension.
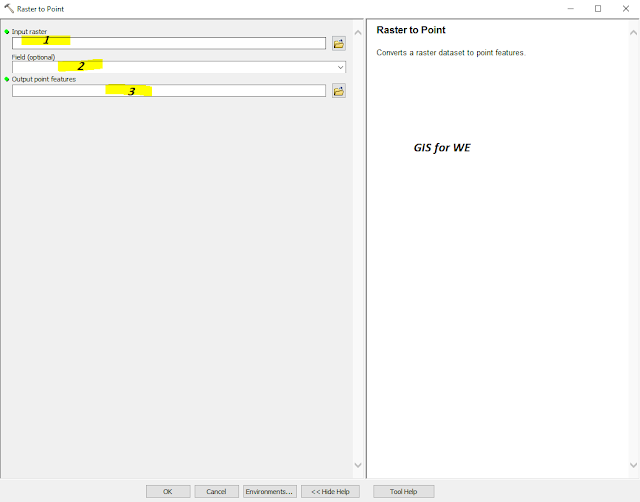
Raster to Point
How to use Raster to Point Tool in ArcToolbox ArcMap ArcGIS??
 |
| Raster to Point |
Path to access the tool
:
Raster to Point Tool, From Raster Toolset, Conversion Toolbox
Raster to Point
Converts a raster
dataset to point features.
1.
Input raster
The input raster
dataset.
The raster can be
integer or floating-point type.
2.
Field (optional)
The field to assign
values from the cells in the input raster to the points in the output dataset.
It can be an integer,
floating point, or string field.
3.
Output point features
The output feature class that will contain the converted points.
Raster to Polygon
How to use Raster to Polygon Tool in ArcToolbox ArcMap ArcGIS??
 |
| Raster to Polygon |
Path to access the tool
:
Raster to Polygon Tool, From Raster Toolset, Conversion Toolbox
Raster to Polygon
Converts a raster
dataset to polygon features.
1.
Input raster
The input raster dataset.
The raster must be
integer type.
2.
Field (optional)
The field used to assign
values from the cells in the input raster to the polygons in the output dataset.
It can be an integer or
a string field.
3.
Output polygon features
The output feature class
that will contain the converted polygons.
4.
Simplify polygons (optional)
Determines if the output polygons will be smoothed into simpler shapes or conform to the input raster's cell edges.
- Checked—The polygons will be smoothed into simpler shapes. The smoothing is done in such a way that the polygons contain a minimum number of segments while remaining as close as possible the original raster cell edges. This is the default.
- Unchecked—The edge of the polygons will conform exactly to the input raster's cell edges. With this option, converting the resulting polygon feature class back to a raster would produce a raster the same as the original.
5. Create multipart features (optional)
Specifies whether the output polygons will consist of single-part or multipart features.
- Checked—Specifies that multipart features will be created based on polygons that have the same value.
- Unchecked—Specifies that individual features will be created for each polygon. This is the default.
6.
Maximum vertices per polygon feature (optional)
The vertex limit used to subdivide a polygon
into smaller polygons. This parameter produces similar output as created by the
Dice tool.
If left empty, the output polygons will not be split. The default is empty.
Raster to Polyline
How to use Raster to Polyline Tool in ArcToolbox ArcMap ArcGIS??
 |
| Raster to Polyline |
Path to access the tool
:
Raster to Polyline Tool, From Raster Toolset, Conversion Toolbox
Raster to Polyline
Converts a raster
dataset to polyline features.
1.
Input raster
The input raster
dataset.
The raster must be
integer type.
2.
Field (optional)
The field used to assign
values from the cells in the input raster to the polyline features in the
output dataset.
It can be an integer or
a string field.
3.
Output polyline features
The output feature class
that will contain the converted polylines.
4.
Background value (optional)
Specifies the value that will identify the background cells. The raster dataset is viewed as a set of foreground cells and background cells. The linear features are formed from the foreground cells.
- ZERO—The background is composed of cells of zero or less or NoData. All cells with a value greater than zero are considered a foreground value.
- NODATA—The background is composed of NoData cells. All cells with valid values belong to the foreground.
5.
Minimum dangle length (optional)
Minimum length of dangling polylines that will be retained. The default is zero.
6.
Simplify polylines (optional)
Simplifies a line by removing small fluctuations or extraneous bends from it while preserving its essential shape.
- Checked—The polylines will be simplified into simpler shapes such that each contains a minimum number of segments. This is the default.
- Unchecked—The polylines will not be simplified.
Raster To Video
How to use Raster To Video Tool in ArcToolbox ArcMap ArcGIS??
 |
| Raster To Video |
Path to access the tool
:
Raster To Video Tool, From Raster Toolset, Conversion Toolbox
Raster To Video
Creates an AVI or
Quicktime video file from a set of images.
1. Input Folder
The folder containing
the images that will be used to create the video. The images must all be of the
same format, either bitmap (*.bmp) or JPEG (*.jpg).
2.
Output Video File
The output video file
can be stored in the AVI format (*.avi) or in the Quicktime format (*.mov).
3.
Image Format (optional)
The format of the images files in the folder. The output video will be created using the images of the chosen format.
- BMP— Windows Bitmap (*.bmp)
- JPG—JPEG (*.jpg)
4.
Codec (optional)
The codec used for compressing the frames while
writing the video file. The list of codecs can vary on different machines based
on a number of factors such as the applications installed on the machine.
5.
Output Duration Method (optional)
The method to be used for defining the duration of the Output Video File.
- FRAME_RATE— Defines the duration of the output video based on the number of frames per second. Each image represents one frame. If the frame rate is 24 and there are 360 images, the resulting video will be 15 seconds long. This method is the default
- TIME— Defines the duration of the output video in seconds. If the total time is 10 seconds and there are 360 images, the resulting video's frame rate will be 36.
6.
Frame Rate or Time (optional)
Duration of the video to be output. If the
Output Duration Method is specified using frame rate, the number must be an
integer. If the method is using time, the number is expressed in units of
seconds.
7.
Quality (optional)
The quality of the output video. The higher the value, the better the quality, and the lower the compression rate. The quality value can range from 1 to 100, if The default value is 100.

Comments
Post a Comment